
A bad roof to wall flashing detail is one of the most expensive mistakes a roofer can make, and it’s one homeowners almost never see until water is already inside the wall. Step flashing, kickout flashing, and the way they integrate with the housewrap and siding are what keep water from running down the roof and into the wall cavity. Get the details right and the wall stays dry for decades. Get them wrong and you’re looking at rotted sheathing, mold, and a repair bill that climbs into the tens of thousands. For homeowners in Davidson and surrounding areas with roof-to-wall transitions on their home, knowing what to look for can save you from a leak you didn’t see coming.
Here’s what you’ll learn in this guide:
- Why these flashing details matter: How small mistakes turn into major water damage.
- The eight most common errors: What goes wrong and what proper installation looks like.
- How to spot trouble: Warning signs that point to a flashing problem.
Why Roof to Wall Flashing Is the Most Important Detail on Your Roof
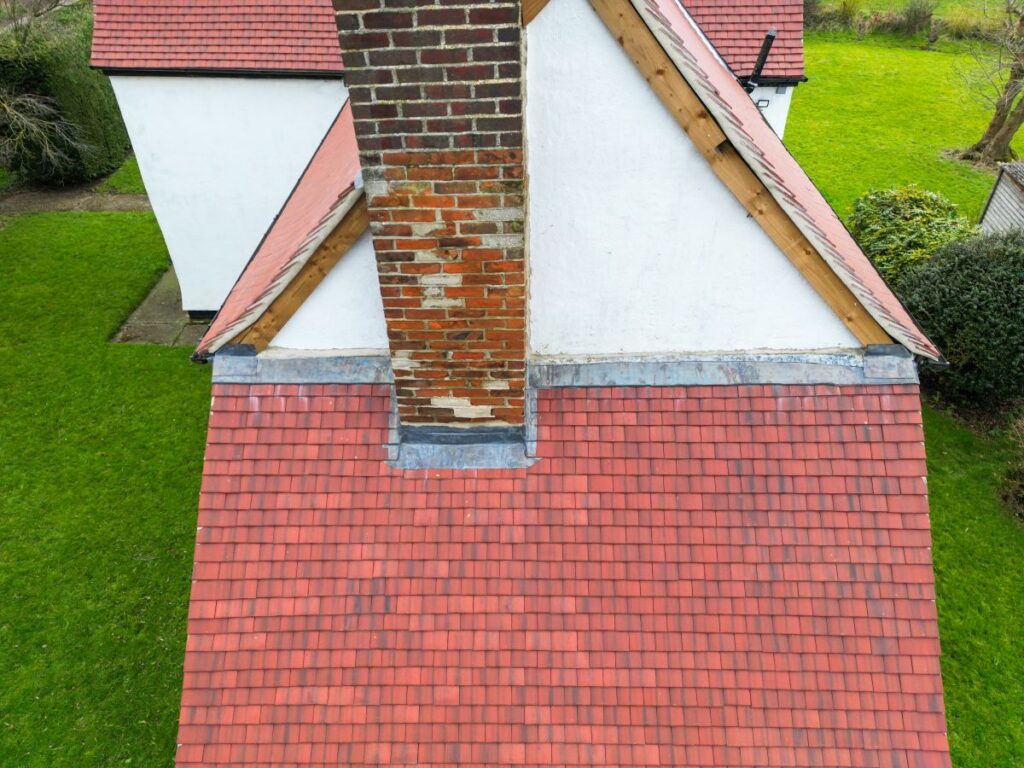
Roof to wall intersections are the single most vulnerable point on a typical residential roof. Water running down the roof above hits a vertical wall and has nowhere to go. If the flashing system isn’t built right, that water finds a path behind the siding, into the sheathing, and eventually into your home.
How Step Flashing and Kickout Flashing Work Together
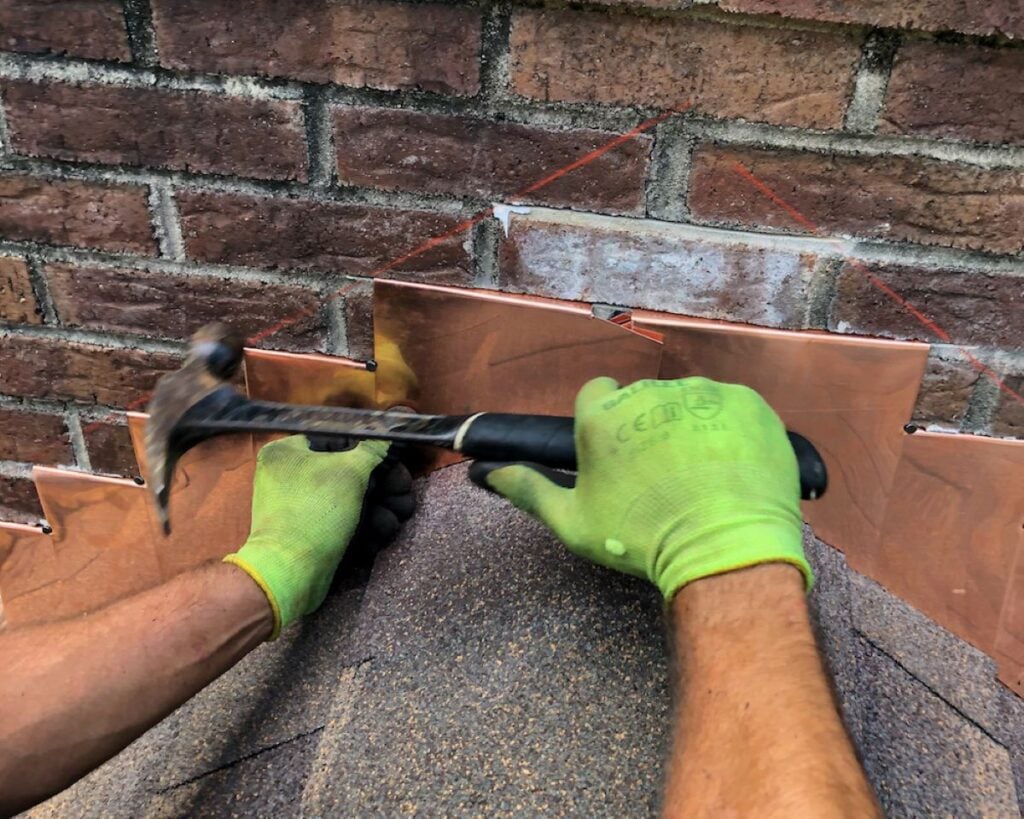
Step flashing and kickout flashing are two pieces of a single system. Step flashing runs up the wall along the slope of the roof, with each piece overlapping the next like shingles. Kickout flashing sits at the bottom of that run and diverts water away from the wall and into the gutter. Both have to be there. Both have to be installed correctly. According to the Building America Solution Center, a U.S. Department of Energy resource, step flashing must extend at least 4 inches up the wall from the roof deck and at least 4 inches out along the roof deck per the 2015 International Residential Code, with corrosion-resistant materials integrated into the wall’s drainage plane.
- Step flashing: L-shaped pieces that overlap up the slope where roof meets wall.
- Kickout flashing: Diverter at the bottom of a run that pushes water away from the wall.
- Drip edge: Metal flashing along the roof edge that protects the deck.
- Housewrap integration: The wall’s water resistive barrier laps over the flashing.
- Counterflashing: Optional cap flashing that covers the top edge of step flashing.
Why These Details Get Skipped or Done Wrong
Roof to wall flashing is one of the most labor-intensive parts of a roof installation, especially on a re-roof. Doing it right means removing siding, integrating the flashing with the housewrap, and rebuilding the wall layers in the proper order. Cutting that work shortens the project but creates a leak waiting to happen. Some contractors skip it because the homeowner won’t see it. We see the consequences every week on inspections in Davidson and surrounding areas.
- Labor cost: Proper integration adds hours per intersection on a re-roof.
- Siding removal: Doing it right requires opening the siding, which most homeowners don’t expect.
- Hidden work: Customers can’t see the flashing once siding is replaced.
- Code enforcement gaps: Inspectors don’t always catch flashing errors during final review.
- Warranty exclusions: Many shingle warranties don’t cover damage caused by flashing failures.
8 Roof to Wall Flashing Errors That Lead to Leaks
The eight errors below are the ones we see most often during inspections. Some are obvious from the ground. Some only show up when the wall is opened up. All of them cause leaks if left in place long enough.
1. Missing Step Flashing Entirely
Some roofs are built with no step flashing at all. A continuous strip of flashing gets bent and run up the wall, or worse, the shingles butt directly against the wall with nothing but caulk between them. This fails fast. Caulk-only seals dry out, crack, and leak within a few years. Step flashing exists because nothing else works long-term.
- Caulk-only installations: Sealant alone fails within 3 to 5 years.
- Continuous flashing strips: Don’t allow water to shed properly between courses.
- Code violation: Missing step flashing violates IRC requirements at roof-wall intersections.
- Shingle warranty risk: Most manufacturers won’t honor warranties without proper flashing.
- Detection: Often visible from the ground as exposed metal or sealed shingles against the wall.
2. Step Flashing That’s Too Short
Step flashing has minimum dimensions for a reason. If the pieces are too short, water finds its way around them. Code requires at least 4 inches up the wall and 4 inches across the roof deck, with each piece overlapping the next by 2 inches minimum.
- Minimum 4 inch wall leg: Required by IRC, with 7 inches preferred for extra protection.
- Minimum 4 inch roof leg: Must extend onto the roof deck under the shingle above.
- 2 inch overlap: Each piece must overlap the piece below it by at least 2 inches.
- Custom fabrication: Some contractors cut flashing too short to save material.
- Effect: Short flashing allows water to bypass the system during heavy rain.
3. Missing Kickout Flashing
Kickout flashing has been required by the International Residential Code since 2009, yet it’s still one of the most commonly missed pieces of flashing on residential roofs. When the bottom of a roof slope meets a vertical wall and the gutter terminates against that wall, kickout flashing diverts the water into the gutter. Without it, water pours down the wall behind the siding and rots the sheathing from the inside.
- Code requirement: Required by IRC R903.2.1 since 2009.
- Common location: Where a garage roof meets a two-story wall, or where a gutter ends against a chimney.
- Damage indicator: Water staining or algae on siding below where a gutter ends.
- Hidden cost: Years of water runoff can rot framing without any visible interior signs.
- Installation cost: A $20 piece of flashing prevents thousands in damage.
4. Kickout Flashing at the Wrong Angle
Kickout flashing only works at the right angle. Code-compliant kickouts sit at roughly 110 degrees, which forces water away from the wall and into the gutter. Anything less than 110 degrees lets water bridge the gap and run down the wall anyway. Some contractors bend a piece of counterflashing on site as an improvised kickout, and these field-fabricated versions almost always have the wrong angle, unsealed seams, or both.
- Required angle: 110 degrees for proper water diversion.
- Pre-manufactured versus field-fabricated: Pre-made kickouts hold their angle and seal correctly.
- Wing extension: The wing should extend at least 4 inches up the sidewall.
- Field-bent failures: On-site bending often produces unsealed seams that fail.
- Visual check: A proper kickout protrudes noticeably from the wall, not flush with it.
5. Improper Integration With Housewrap
This is the error that does the most hidden damage. Step flashing has to integrate with the wall’s water resistive barrier in the right order. The housewrap or building wrap must lap over the vertical leg of the step flashing, not under it. Done wrong, water that gets behind the siding has a direct path into the wall cavity.
- Correct order: Housewrap laps over the vertical leg of the step flashing.
- Wrong order: Housewrap behind the flashing creates a funnel into the wall.
- Why it happens: Re-roofing without removing siding makes proper integration nearly impossible.
- Detection: Almost impossible to verify without opening the wall.
- Long-term cost: Hidden water damage often goes undetected for years.
6. Sealant Used Instead of Proper Flashing
Caulk and roofing cement are not flashing. They’re temporary sealants meant to supplement properly installed metal flashing, not replace it. Some contractors smear roofing cement at the roof-to-wall intersection and call it done. Within a year or two, the sealant cracks and water gets in.
- Sealant lifespan: Most exterior sealants fail within 3 to 7 years in North Carolina weather.
- Movement issues: Buildings flex with temperature changes, and sealant can’t keep up.
- UV breakdown: Sun exposure accelerates sealant deterioration.
- Code violation: Sealant alone doesn’t meet flashing requirements anywhere in the IRC.
- Repair cost: Removing failed sealant and installing proper flashing requires opening the area.
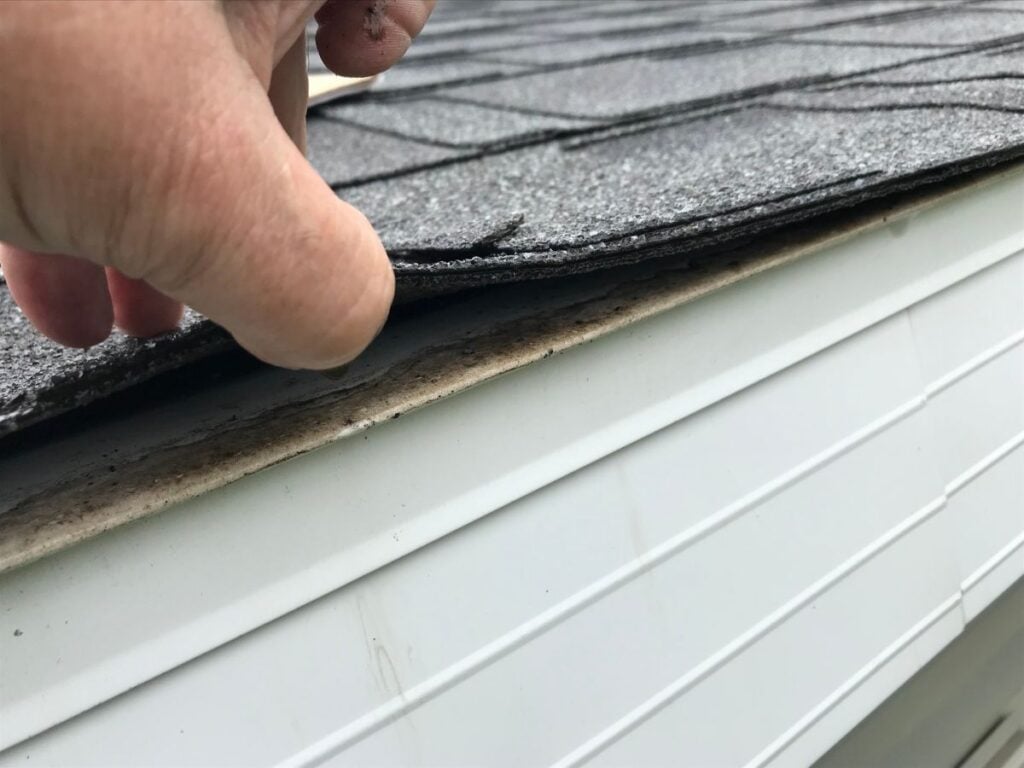
7. Siding That’s Too Close to the Roof Surface
Siding has to maintain a minimum gap from the roof surface. When siding sits directly on the shingles or extends below the top of the step flashing, water gets trapped between the siding and the roof. That trapped water finds its way into the wall, the deck, or both.
- Minimum gap: At least 1 inch between the roof surface and the bottom of the siding.
- Why it matters: Air gap allows water to drain and the wall to dry.
- Common on retrofits: Older homes often have siding installed before code addressed the gap.
- Capillary action: Tight contact between siding and roof pulls water upward.
- Visible sign: Siding showing rot, paint failure, or staining at the bottom edge near a roof line.
8. Reusing Old Flashing on a Re-Roof
Some contractors save money by leaving the old flashing in place during a re-roof. Old metal flashing has corroded, dented, or pulled away from the wall over time. Even if it looks intact from the ground, it’s almost never sealing properly anymore. New shingles over old flashing is a leak with a delayed timer.
- Corrosion from age: Galvanized flashing loses its protective coating over 15 to 20 years.
- Mechanical damage: Old flashing often has dents, bends, or fastener failures.
- Sealant failure: Original sealant under old flashing has long since failed.
- Code requirement: Most re-roof codes require new flashing as part of the project.
- Cost difference: New flashing adds modest cost compared to the price of fixing later water damage.
How to Spot Roof to Wall Flashing Problems
Most flashing errors show up indirectly. The flashing itself is often hidden, but the symptoms aren’t. Knowing what to look for can help you catch problems before they become wall reconstruction projects.
Warning Signs Visible From the Ground
Walk around your home after a rainstorm and look at the spots where roofs meet walls. The signs of a flashing problem are usually right there. You don’t need a ladder for most of them. We do this on inspections in Davidson and surrounding areas, and the homeowners who pay attention to these signs catch problems years earlier than the ones who don’t.
- Staining on siding: Dark streaks below where a gutter ends or a roof meets a wall.
- Algae or moss growth: Persistent green growth low on the wall indicates retained moisture.
- Paint failure or peeling: Bubbling, peeling, or flaking paint near a roof-wall intersection.
- Visible rot at trim: Soft wood at the base of trim boards near roof lines.
- Interior signs: Stains on ceilings or upper walls that align with roof-wall transitions outside.
What a Professional Inspection Reveals
A professional roofing inspection examines the flashing details up close and checks the integration where possible. Inspecting the wall side of the flashing usually requires opening up siding, but a thorough inspection from the roof can identify most installation errors before they cause major damage.
- Step flashing dimensions: Verifies each piece meets minimum size requirements.
- Kickout presence and angle: Confirms the diverter is installed at the proper 110-degree angle.
- Housewrap visibility: Checks for visible signs of housewrap integration where accessible.
- Sealant condition: Identifies failed sealant and missing flashing components.
- Damage assessment: Documents any moisture damage already in progress.
Frequently Asked Questions
How much does it cost to fix roof to wall flashing?
Repairing roof to wall flashing typically costs $400 to $1,500 for isolated repairs, depending on access and the extent of damage. Full re-flashing of a roof-wall intersection during a re-roof adds $200 to $800 to the project cost. If hidden water damage is already present, repair costs can climb significantly higher.
How long does roof to wall flashing last?
Properly installed metal step flashing and kickout flashing typically last 25 to 40 years, often matching the lifespan of the roof itself. Galvanized flashing tends toward the lower end of that range, while higher-grade metals like copper can last 50 plus years. The integration with housewrap and siding usually fails before the metal does.
Can I tell if my flashing is installed correctly without opening the wall?
You can identify many flashing problems from the ground or a ladder. Visible step flashing edges, the presence of kickout diverters, the gap between siding and roof, and the condition of sealants are all checkable without opening the wall. Hidden integration issues require either an interior inspection during damage, or opening the wall during repair.
Does homeowners insurance cover flashing damage?
Homeowners insurance typically covers water damage caused by sudden events, not gradual leaks from improper flashing installation. If a storm damages flashing, the resulting water damage is usually covered. If the flashing was installed incorrectly from the start, the carrier may deny the claim as a maintenance issue.
Why didn’t the original roofer install kickout flashing?
Kickout flashing has been code-required since 2009, but it’s still skipped on many homes built before that date and even on some newer ones. Some contractors avoid it because installing it correctly requires removing a portion of siding. The cost savings on the install transfer to the homeowner as repair costs years later.
Do I need a permit to repair flashing?
Most flashing repairs done as part of a re-roof are covered under the roofing permit. Standalone flashing repairs typically don’t require a separate permit in North Carolina. A licensed roofing contractor handles permit requirements as part of any major project.
Why Roof Medic Is the Right Team for Your Roof to Wall Flashing Project
Roof Medic is a GAF Master Elite Contractor and CertainTeed SELECT ShingleMaster, placing us in the top 3% of roofers nationwide. We treat roof to wall flashing as the critical detail it is, not an afterthought. We inspect the flashing details on every roof we evaluate and document them with photos when we find problems. If your existing flashing is doing its job, we’ll tell you. If it needs to be replaced or supplemented during a re-roof, we’ll explain exactly what we found and what proper installation looks like. Our workmanship warranty is 2 years standard and 5 years when homeowners follow our recommended approach, all backed by a veteran-owned team that takes your home as seriously as you do.
Want guidance on your roof to wall flashing or want to learn more about how we approach the details that other roofers skip? Contact Roof Medic today. We serve homeowners throughout Davidson and surrounding areas and we’re happy to walk you through what proper flashing looks like, what it costs, and how to know if your home has a problem worth fixing.

